Quantcast
Channel: Doyensys Allappsdba Blog..
Viewing all 1640 articles
Browse latest View live

Punchout Configuration

$
0
0

Overview : What is Punchout?

Punchout is a feature from iProcurement and Oracle Supplier Network which allows to access the external catalog and bring the items to iProcurement in order to create requisitions. The external catalog can be hosted by a third party organization or by the supplier.

           1. Requester/preparer clicks the Punchout link.
           2. Login request is sent to the supplier server.
           3. Supplier authenticates the access and sends the login response.
           4. iProcurement redirects the browser to the supplier catalog site.
           5. Requester/preparer searches the items and returns to iProcurement.
           6. Shopping cart is processed by iProcurement. 
           

Pre-requirements:

1. Punchout (supplier site) access from Oracle Applications - reach network/firewall team 

2. Get SSL (SHA, TLS Certificate) from External Suppplier, if it is Secured.

3. Once you get the .cer file from supplier, export it as base64 and open/save it in notepad (as .txt)

Configuration Steps:

1. Ask your functional person to do the below:

In iProcurment Punchout is configured by following steps  

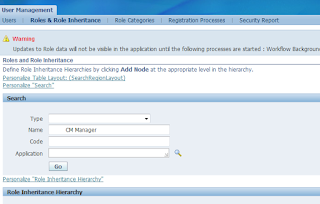
1.1. Go to iProcurement Catalog Administration responsibility > Stores > Content Zones
1.2. In the dropdown list choose Create Punchout Content Zone or Create Transparent Punchout  Content Zone.
1.3. Click GO
1.4. Enter the Punchout information
1.5. Click Apply
1.6. Now go to Stores > Stores
1.7. Create a new store or choose an existing one
1.8. Add the Punchout definition created above in the Content Zone.

In release 12 the realms were replaced by Content Zone which is used to restrict access  by category, suppliers, operating units, and/or responsibilities.

2. Enter the absolute file path of the certificates file that stores the certificates' names in Profile "POR :CA Certificate File Name".
     
The certificate file is located at tech_st directory structure: 
/.../apps/tech_st/10.1.2/sysman/config/b64InternetCertificate.txt

3. Enter the proxy server (web server) name in "POR :Proxy Server Name"
The proxy server name is typically the same as the proxy server that
is set up in people's browsers in your company's. if there is no proxy, ensure it is null.

4. Enter the proxy server port for the server defined in profile POR :Proxy Server Name in  profile "POR :Proxy Server Port". if there is no proxy, ensure it is null.
    
5. The certificate is required if the punchout sites are secured (SSL enabled). Profile POR :CA Certificate File Name will be used to execute the handshake and verify the valid certificates. 

If punchout site is using certificate  which is not included in the b64InternetCertificate.txt (or the file from profile POR :CA Certificate File Name),  append it in the beginning of file. Append only the trusted certificates.

6. If profiles and certificates changed bounce the oacore, apache and oafm for the change to take effect. 

Please note :If profiles above are not set properly, errors like Connection refused, SSL handshake errors could occur.

--Narasimha Rao

Article 5

$
0
0

   Steps to change APPS password in EBS 12.2


From EBS 12.2, after changing APPS password using FNDCPASS/AFPASSWD, we need to perform some additional manual steps (partially automated with R12.AD.C.Delta.7 and R12.TXK.C.Delta.7), to update WLS data source.

Here are the steps:

1. Shut down the application tier services using the below script:
$INST_TOP/admin/scripts/adstpall.sh

2. Change the APPLSYS password using

FNDCPASS apps/<appspwd> 0 Y system/<system_manager> SYSTEM APPLSYS <new_apps_passwd>

3. Run autoconfig with the newly changed password.

4. Start AdminServer using the $INST_TOP/admin/scripts/adadminsrvctl.sh script, from RUN filesystem. Do not start any other application tier services.

5. Change the "apps" password in WLS Datasource as follows:

a. Log in to WLS Administration Console.
b. Click Lock & Edit in Change Center.
c. In the Domain Structure tree, expand Services, then select Data Sources.
d. On the "Summary of JDBC Data Sources" page, select EBSDataSource.
e. On the "Settings for EBSDataSource" page, select the Connection Pool tab.
f. Enter the new password in the "Password" field.
g. Enter the new password in the "Confirm Password" field.
h. Click Save.
i. Click Activate Changes in Change Center.

OR

With R12.AD.C.Delta.7 and R12.TXK.C.Delta.7, we got a script for updating the data source password.

Change the APPS password in WLS Data Source by running the the following script as shown:

$ perl $FND_TOP/patch/115/bin/txkManageDBConnectionPool.pl
When prompted, select ‘updateDSPassword’ to change the APPS password in the WLS Datasource.

6. Start all the application tier services using the below script
$INST_TOP/admin/scripts/adstrtal.sh

7. Verify the WLS Datastore changes as follows:

a. Log in to WLS Administration Console.
b. In the Domain Structure tree, expand Services, then select Data Sources.
c. On the "Summary of JDBC Data Sources" page, select EBSDataSource.
d. On the "Settings for EBSDataSource" page, select Monitoring > Testing.
e. Select "oacore_server1".
f. Click Test DataSource
g. Look for the message "Test of EBSDataSource on server oacore_server1 was successful".


Oracle Transport Agent for XML Gateway

$
0
0

How to Configure Oracle Transport Agent (OTA) for XML Gateway.

OTA Overview:

In E-Business Suite Applications (EBS) Release 12 (R12), 
Jserv is no longer used in the applications tier for java components. 
It has been replaced by the Oracle Containers for J2EE (OC4J) component. 
The configuration and setup for Oracle Transport Agent (OTA) has changed accordingly.

Oracle Transport Agent (OTA) is a lightweight messaging platform for transmitting documents over HTTP and Secure HTTP (HTTPS).  
OTA implements a messaging protocol on top of the HTTP Application protocol. 

The OTA server is a Java-based servlet that uses the OTA messaging protocol to support the following requirements:

1. Guaranteed, exactly-once delivery of a message over HTTP(S)
2. Complete audit and history tracking of messages sent and received
3. Outbound e-mail delivery of messages (SMTP)
4. Server certificate authentication (when using SSL mode)
5. Client certificate authentication
6. Built-in Application user authentication to Oracle e-Business Suite and Oracle Exchange.


OTA used for transmitting Purchase Orders as XML format to External Suppliers. 

Steps to configure Oracle Transport Agent (OTA)

1. Enable ASADMIN user

- Log onto Oracle E-Business Suite using sysadmin/<sysadmin_pw>.
- Select the User Management responsibility in the Navigator.
- Click the Users link from the navigation menu to open the User Maintenance window.
- Locate 'ASADMIN' user by entering information in the search area to retrieve the 'ASADMIN' user.
- Click the Update icon next to the ASADMIN user to open the Update User window.
- Remove the Active To date field and click Apply in case is not already removed
- Click the Reset Password icon next to the ASADMIN user to open the Reset Password window.
- Enter new password twice and click Submit
- Login as ASADMIN and change the password as it prompts when logging for the  first time

2. Take backup and Update the same password of ASADMIN in system-jazn-data.xml file to be ! (! in front is mandatory).
$ORA_CONFIG_HOME/10.1.3/j2ee/oafm/config/system-jazn-data.xml

3. Set OASMTPServer=<smtp server name> to $INST_TOP/ora/10.1.3/j2ee/oafm/config/oc4j.properties

4. Bounce the oafm services

sh $ADMIN_SCRIPTS_HOME/adoafmctl.sh stop
sh $ADMIN_SCRIPTS_HOME/adoafmctl.sh start

4. Ensures ECX Inbound Agent Listener & ECX Transaction Agent Listener is running.

System administrator --> Oracle application manager --> Workflow --> Service Components --> ECX Inbound Agent Listener & ECX Transaction Agent Listener should be up and running ( if not , start the services ).

Ensure all other workflow agents are also up and running.

-- Narasimha Rao

SQL Query to get list of user,assigned responsibilties and assigned modules

$
0
0

Below SQL Query helps us to get list of users, assigned responsibilities and its modules.

Query gets "Last time the user used the responsibility", User's Person Name, Email address, Users' Employee Number, User ID's Start date, User ID's End date, Assigned Responsibility name, Responsibility's Module name, 
User's User-id.

SELECT MAX (flr.start_time) "Last accessed",
         papf.full_name "Person name",
         papf.email_address "Email Id",
         papf.employee_number "Employee number",
         fu.start_date "Start date",
         fu.end_date "End Date",
         flt.responsibility_name "Responsibility Name",
         fa.application_name "Module",
         fu.user_name
    FROM fnd_logins fl,
         fnd_login_Responsibilities flr,
         fnd_user fu,
         fnd_responsibility_tl flt,
         fnd_application_vl fa,
         per_all_people_f papf
   WHERE     flr.login_id = fl.login_id
         AND flt.responsibility_id = flr.responsibility_id
         AND fu.user_id = fl.user_id
         AND fa.application_id = FLT.APPLICATION_ID
         AND FLR.RESP_APPL_ID = fa.application_id
         AND flr.resp_appl_id = flt.application_id
         AND FLT.LANGUAGE = 'US'
         AND FU.EMPLOYEE_ID = PAPF.PERSON_ID(+)
GROUP BY papf.full_name,
         papf.email_address,
         papf.employee_number,
         fu.start_date,
         fu.end_date,
         flt.responsibility_name,
         fa.application_name,
         fu.user_name
ORDER BY fa.application_name

-- Narasimha Rao

CE UMX Security Roles Assignment to Cash Management Responsibility

$
0
0

This post is to guide "CE UMX Security" Roles Assignment to Cash Management Responsibility

1. Login to sysadmin , navigate to User Management / Roles and Role Inheritance.

2. Query the responsibility.


3. Click on Update.


4.  Click on security Wizard.


5. Click on save and Proceed


6.  Click on Run Wizard over “CE UMX Security Wizard”


7.  Click on Add Legal Entities


8. Query and Select the Legal Entity to be assigned.


9.  Click the check box on use, Maintenance and Bank Account Transfers , and click apply.


10.  Ensure / Review the data , and click on apply.


11. Run Workflow Background process once manually,  with mandatory parameters Yes, Yes

How to debug Outbound ECX Transactions ( XML PO Transmission)

$
0
0

There is a very good diagnostics script provided by oracle support it self.

When you execute the sql script, it produces the html output, 
which shows all the required data to troubleshoot specific PO (document/ ECX Transactions issue).

XML Gateway Data Collection Script for Outbound ECX Transactions (Doc ID 742618.1)


Key areas to check in diagnostics output.

1. Check whether the OTA is running or not.

2. Ensure that Protocol Type and Protocol address is correct


3. Check the Exception Text in ECX_OXTA_LOGMSG part for Errors / Error Message, to troubleshoot the issue further.


-- Narasimha Rao


Converting HTTPS TO HTTP for Oracle applications

$
0
0

This post is to guide to Convert HTTPS TO HTTP for Oracle applications.


1. Bring down Oracle applications:

cd $ADMIN_SCRIPTS_HOME
sh adstrtal.sh apps/apps123

2. Change the below parameters in .xml file for conversion from https to http

s_chronosURLChange from https to http
s_endUserMonitoringURLChange from https to http
s_webentryurlprotocolChange from https to http
s_active_webport                Ensure it is <active web port> and not SSL port
s_login_page        Change from https to http
s_external_url        Change from https to http
<sslterminator oa_var="s_enable_sslterminator"/> 
to <sslterminator oa_var="s_enable_sslterminator">#</sslterminator> 


<chronosURL oa_var="s_chronosURL">http://a111.x111.com:8030/oracle_smp_chronos/oracle_smp_chronos_sdk.gif</chronosURL>

<EndUserMonitoringURL oa_var="s_endUserMonitoringURL">http://a111.x111.com:8030/oracle_smp_chronos/oracle_smp_chronos_sdk.gif</EndUserMonitoringURL>

<webentryurlprotocol oa_var="s_webentryurlprotocol">http</webentryurlprotocol>

<login_page oa_var="s_login_page">http://a111.x111.com:8030/OA_HTML/AppsLocalLogin.jsp</login_page>

<externURL oa_var="s_external_url">http://a111.x111.com:8030</externURL>

<activewebport oa_var="s_active_webport" oa_type="DUP_PORT" base="8000" step="1" range="-1" label="Active Web Port">8030</activewebport>

<sslterminator oa_var="s_enable_sslterminator">#</sslterminator>


3. Run adautocfg.sh , bring up applications , and  verify that login page is appearing http.

cd $ADMIN_SCRIPTS_HOME
sh adautocfg.sh appspass=apps123
sh adstrtal.sh apps/apps123

--Narasimha Rao

Oracle Applications Server level Setups related to Dunning letters

$
0
0

This post related to Oracle Applications Server level Setups related to Dunning letters.

Assumption: It is assumed that the Dunning letter process is not customized.
below steps applies for standard process.

1. Ensure the profile has correct smtp server name "IEX: SMTP host",if not enter the correct smtp server name and save it.

2. Enter the valid email address through which the dunning letters need to be sent "IEX:SMTP from".

3. Configuring XDO : xdodelivery.cfg 

3.1 Login to Oracle Applications concurrent manager server, cd $XDO_TOP

3.2 check resource folder exists , if not create resource folder

3.3 if resource exists , check xdodelivery.cfg exists or not, if not create xdodelivery.cfg.

3.4 Add the below entry in xdodelivey.cfg. in the host tag, ensure correct smtp hostname, in port tag ensure correct smtp port (which generally 25)

<server name="mysmtp1" type="smtp_email" default="true">
<host>mail.gmail.com</host>
<port>25</port>
</server>

3.5 Bounce oacore,apache and oafm services.

-- Narasimha Rao

Query to get bind variable, eplan using sql_id and eplan using sql text with table format

$
0
0


Please find the queries below.


1)  BIND VARIABLE USING SQL_ID
    =============================


column name format a30
column datatype_string format a30
column value_string format a30
set lines 120 pages 200
accept v_sql_id prompt 'Enter SQL_ID->'
Select name, datatype_string, value_string
    from v$sql_bind_capture
  where sql_id = '&v_sql_id';


2)  EPLAN USING SQL_ID
  =======================


set lines 160
set pages 1000
SELECT * FROM table(DBMS_XPLAN.DISPLAY_AWR('&sqlid'));


3)  EPLAN USING SQL TEXT
 =======================


set lines 150
set echo on
set pages 500
set serveroutput off
set define off
delete from  plan_table where statement_id='abc';
commit;
spool eplan11g
explain plan for
Give the select statement here for ex: (select*from saleslog where Status ='Pending';)
select * from table(dbms_xplan.display());
spool off


Query to find blocking session details for the past by using time interval

$
0
0


Please find the queries below.


1) The below one will show all the sessions.


set lines 170
set pages 10000
col event format a40
col sample_time format a40
select to_char(sample_time,'DD-MON-YY HH24:MI:SS'),SESSION_ID,SESSION_SERIAL#,SQL_ID,BLOCKING_SESSION,BLOCKING_SESSION_SERIAL#,BLOCKING_SESSION_STATUS,EVENT from dba_hist_active_sess_history where to_char(sample_time,'DD-MON-YY HH12:MI:SS') between '19-DEC-16 06:10 PM' and '19-DEC-16 06:20 PM'  and BLOCKING_SESSION is not null order by 1 ;


2) The below one will show the sessions for tx enqueue row lock contention alone.


set lines 170
set pages 10000
col event format a40
col sample_time format a40
select to_char(sample_time,'DD-MON-YY HH24:MI:SS'),SESSION_ID,SESSION_SERIAL#,SQL_ID,BLOCKING_SESSION,BLOCKING_SESSION_SERIAL#,BLOCKING_SESSION_STATUS,EVENT from dba_hist_active_sess_history where to_char(sample_time,'DD-MON-YY HH12:MI:SS') between '19-DEC-16 06:20 PM' and '19-DEC-16 06:30 PM' and event like '%enq:%' and BLOCKING_SESSION is not null order by 1 ;


3) The below one will show the blocking sql text by using the sql_id


set long 10000
set pages 10000
select SQL_FULLTEXT from v$sql where SQL_ID = '&1' and rownum < 2;

Steps to Purge a Distributed Transaction from a Database. (ORA-24756: transaction does not exist tips)

$
0
0


Please follow the below steps.


If the remote database cannot be accessed, a failed distributed transaction cannot be committed or rolled back and so must be purged from the list of pending transactions.


For ex. the error we will get in alert log as ORA-24756: transaction does not exist 


1. Identify the id of the transaction:


SQL> column global_tran_id format a25
SQL> column database format a22
SQL> column global_name format a22
SQL> SELECT * from global_name;
SQL> SELECT LOCAL_TRAN_ID, GLOBAL_TRAN_ID,to_char(FAIL_TIME,'dd-mon-yyyy HH24:MI:SS'),STATE, MIXED FROM DBA_2PC_PENDING;
SQL> SELECT LOCAL_TRAN_ID, IN_OUT,INTERFACE, DATABASE FROM DBA_2PC_NEIGHBORS;


2. Purge the transaction:


SQL> EXECUTE DBMS_TRANSACTION.PURGE_LOST_DB_ENTRY('<transaction_id>');
SQL> COMMIT;


3. Confirm that the transaction has been purged:


SQL> SELECT LOCAL_TRAN_ID, GLOBAL_TRAN_ID,to_char(FAIL_TIME,'dd-mon-yyyy HH24:MI:SS'),STATE, MIXED FROM DBA_2PC_PENDING;


SQL> SELECT LOCAL_TRAN_ID, IN_OUT,INTERFACE, DATABASE FROM DBA_2PC_NEIGHBORS;


While trying to purge the transactions, if you hit error ORA-06510 as shown below :

======================================================


BEGIN DBMS_TRANSACTION.PURGE_LOST_DB_ENTRY('9.32.558'); END;

*
ERROR at line 1:
ORA-06510: PL/SQL: unhandled user-defined exception
ORA-06512: at "SYS.DBMS_TRANSACTION", line 96
ORA-06512: at line 1


you can run the below command to get rid of them.

SQL> rollback force '9.32.558';


Article 5

$
0
0
Applying WebLogic 10.3.6.0 PSU and patch conflicts!

Applying latest PSU Patch Set Update﴿ for latest bug fixes and security vulnerabilities,
(PSU October 2016﴿

Patch ID: K25M
Patch No: 23743997


To find the relevant patch number.:
1. Checked the Critical Patch Updates, Security Alerts and Third Party Bulletin
3. Looked for “Oracle WebLogic Server” and clicked on Fusion Middleware next to the product
4. Searched for “WebLogic Server 10.3.6.0”.

Then download the patch from MOS

Also refer following MOS note.

Oracle E-Business Suite Release 12 Critical Patch Update Knowledge Document (October 2016) (Doc ID 2181748.1)

Set your environment:

cd $FMW_HOME

 cd wlserver_10.3/server/bin

.  ./setWLSEnv.sh


Verify the patch applied or not

bsu.sh -prod_dir=$FMW_HOME/wlserver_10.3 -status=applied -verbose -view | grep -i K25M

Unzip the patch to the cache_dir directory:
cd $FMW_HOME/utils/bsu/cache_dir

cp /oracle/software/p23743997_1036_Generic.zip $FMW_HOME/utils/bsu/cache_dir
unzip p23743997_1036_Generic.zip

Stop all WebLogic servers

Install the patch using the Smart Update command utility:
cd $FMW_HOME/utils/bsu

./bsu.sh install patch_download_dir=$FMW_HOME/utils/bsu/cache_dir patchlist=K25Mprod_dir=$FMW_HOME/wlserver_10.3


Patch Conflicts detected


Conflict condition details follow: 

Patch K25M is mutually exclusive and cannot coexist with patch(es): HSZB,Z62H,5C71,7Z9S,DEM4

This means that the new PSU patch is conflicting with the other patches listed above, so I have 3 options here:
1. Forget about the latest PSU patch and leave– not recommended.
2. Request an “overlay” patch from Oracle Support which effectively merges all of the patches if some patches listed above aren’t included
in the new PSU﴿.
3. If the new PSU contains all of the above patches, remove them first, then apply the new PSU.


Capture patches installed

cd $FMW_HOME/utils/bsu

/bsu.sh -prod_dir=$FMW_Home/wlserver_10.3 -status=applied -view -verbose > /tmp/bsu_patches_installed.log


Remove patches
cd $ FMW_Home/utils/bsu

The below patches are Oracle WebLogic Sever overlay patch for PSU 10.3.6.0.160419. We  need to remove these following patches in order to apply the latest PSU.

 HSZB,Z62H,5C71,7Z9S,DEM4

./bsu.sh -prod_dir= $FMW_Home /wlserver_10.3  -patchlist= <Patch ID> -verbose -remove

Now  Install  the patch.

cd $ FMW_Home/utils/bsu

bsu.sh -install -patch_download_dir=$FMW_HOME/utils/bsu/cache_dir  -patchlist=K25M -prod_dir=$WLS_HOME

  
cd  $FMW_HOME/wlserver_10.3/server/bin
.  ./setWLSEnv.sh

 java weblogic.version|grep PSU
WebLogic Server 10.3.6.0.161018 PSU Patch for BUG23743997 TUE AUG 30 18:34:42 IST 2016

That’s it, WebLogic is installed and patched up-to-date.

For more details on WebLogic PSU conflicts, following  are  good MOS notes.

Announcing Oracle WebLogic Server PSUs (Patch Set Updates) [ID 1306505.1]
Replacement Patches for WebLogic Server PSU Conflict Resolution [ID 1471192.1]


Happy learning !!


Unable to Mount ASM DiskGroup

$
0
0

Your ASM disk group will be vanished for some reasons

if you try to mount it you will get an error some thing like the below

SQL> alter diskgroup DATA1 mount;
     alter diskgroup DATA1 mount
     *
     ERROR at line 1:
     ORA-15032: not all alterations performed


to do so issue the below command

oracleasm scandisks

and then bring the diskgrop online.

SQL> alter diskgroup DATA1 mount;

           Diskgroup altered


Done..!!

Fix Pending Distributed Transactions

$
0
0
Here is how to fix Pending Distributed Transactions

SELECT * FROM DBA_2PC_PENDING

  COUNT(*)
--------------
    1

select max(fail_time) from dba_2pc_pending;

MAX(FAIL_
--------------
03-DEC-16


select 'exec dbms_transaction.purge_lost_db_entry('''||local_tran_id||''' )' , 'commit;' from
dba_2pc_pending 'EXECDBMS_TRANSACTION.PURGE_LOST_DB_ENTRY('''||LOCAL_TRAN_ID||''')''COMMIT;'


exec dbms_transaction.purge_lost_db_entry('15.41.373682' )
commit;


select count(*) from DBA_2PC_PENDING ;

  COUNT(*)
-------------
         0

Done..!!

Moving Data Files Between Oracle ASM Disk Groups Using RMAN

$
0
0
1. Start RMAN and connect to the target database.

$ rman target /

connected to target database: ORCL (DBID=1217369048)

2. Generate a report that shows the names of the data files.

RMAN> REPORT SCHEMA;

Report of database schema for database with db_unique_name ORCL

List of Permanent Datafiles
===========================
File Size(MB) Tablespace           RB segs Datafile Name
---- -------- -------------- ------- ------------------------
1    740      SYSTEM         ***     +DATA/orcl/datafile/system.258.689589737
2    570      SYSAUX         ***     +DATA/orcl/datafile/sysaux.259.689589785
3    55       UNDOTBS1       ***     +DATA/orcl/datafile/undotbs1.260.689589831
4    5        USERS          ***     +DATA/orcl/datafile/users.261.689589837

List of Temporary Files
=======================
File Size(MB) Tablespace           Maxsize(MB) Tempfile Name
---- -------- -------------- ----------- --------------------
1    20       TEMP           32767       +DATA/orcl/tempfile/temp.262.689589851


3. Back up the data file to the new Oracle ASM disk group.

Run the BACKUP AS COPY command to back up the data file on DATA to USERDATA.

For example:

RMAN> BACKUP AS COPY
        DATAFILE "+DATA/orcl/datafile/users.261.689589837"
        FORMAT   "+USERDATA";

Starting backup at 16-DEC-16
allocated channel: ORA_DISK_1
channel ORA_DISK_1: SID=51 device type=DISK
channel ORA_DISK_1: starting datafile copy
input datafile file number=00004 name=+DATA/orcl/datafile/users.261.689589837
output file name=+USERDATA/orcl/datafile/users.256.689682663
  tag=TAG20090616T103101 RECID=13 STAMP=689682663
channel ORA_DISK_1: datafile copy complete, elapsed time: 00:00:01
Finished backup at 16-DEC-16

4. Offline the data file that you intend to move to a new disk group.

Run the following SQL command in the RMAN client. Use two single quotation marks around the name of the data file, not double quotation marks.

For example:

RMAN> SQL "ALTER DATABASE DATAFILE
       ''+DATA/orcl/datafile/users.261.689589837'' OFFLINE";

sql statement: ALTER DATABASE DATAFILE
     ''+DATA/orcl/datafile/users.261.689589837''  OFFLINE

5. Point the control file to the newly created copy of the data file.

Run the SWITCH...TO COPY command in the RMAN client. The TO COPY option of SWITCH switches the data file to the most recent copy of the data file.

For example:

RMAN> SWITCH DATAFILE "+DATA/orcl/datafile/users.261.689589837" TO COPY;

datafile 4 switched to datafile copy
    "+USERDATA/orcl/datafile/users.256.689682663"

The output of this command displays the new name of the data file.

6. Recover the renamed data file.
Run the RECOVER command in the RMAN client.

For example:

RMAN> RECOVER DATAFILE "+USERDATA/orcl/datafile/users.256.689682663";

Starting recover at 16-DEC-16
using channel ORA_DISK_1
starting media recovery
media recovery complete, elapsed time: 00:00:01
Finished recover at 16-DEC-16

7. Bring the data file online.

Run the SQL command in the RMAN client. Use two single quotation marks around the name of the data file, not double quotation marks.

For example:

RMAN> SQL "ALTER DATABASE DATAFILE
      ''+USERDATA/orcl/datafile/users.256.689682663'' ONLINE";

sql statement: ALTER DATABASE DATAFILE
   ''+USERDATA/orcl/datafile/users.256.689682663'' ONLINE

8. Delete the data file copy from the original Oracle ASM disk group.

In this scenario, +DATA/orcl/datafile/users.261.689589837 is the original data file in DATA. Because you issued SET NEWNAME and SWITCH commands for this data file, the original file is now recorded in the RMAN repository as a data file copy. Run a DELETE command in the RMAN client to remove this file.

For example:

RMAN> DELETE DATAFILECOPY "+DATA/orcl/datafile/users.261.689589837";

released channel: ORA_DISK_1
allocated channel: ORA_DISK_1
channel ORA_DISK_1: SID=51 device type=DISK
List of Datafile Copies
=======================
Key     File S Completion Time Ckp SCN    Ckp Time      
------- ---- - --------------- ---------- ---------------
14      4    A 16-DEC-16       864471     16-JUN-09     
        Name: +DATA/orcl/datafile/users.261.689589837
        Tag: TAG20161215T084217

Do you really want to delete the above objects (enter YES or NO)? y
deleted datafile copy
datafile copy file name=+DATA/orcl/datafile/users.261.689589837 RECID=14 STAMP=689683255
Deleted 1 objects


Done..!!


Find segments with corrupted blocks

$
0
0

Find segments with corrupted blocks


RMAN picks up logical block corruption when you use the following option 
in your backup
script:


backup full check logical

The following procedure helps to identify segments with corrupted blocks if 
there are many
occurrences of block corruption in the alert log file:

1. Get the list of all currupted blocks (replace alert_DB.log with the actual file name)

grep 'logical corruption' alert_DB.log > tmp.txt

Output will be something like this:

Error backing up file 16, block 1355: logical corruption
Error backing up file 16, block 1361: logical corruption
Error backing up file 16, block 1365: logical corruption
...

2. Generate an SQL script to find out which segments have corrupted blocks
cat tmp.txt |\
awk '{ printf ("%s %s\n", $5, $7); }' |\
awk -F, '{ printf ("%s %s\n", $1, $2); }' |\
awk -F: '{ printf ("%s\n", $1); }' |\
awk '{ printf ("SELECT SEGMENT_NAME, SEGMENT_TYPE, RELATIVE_FNO FROM DBA_EXTENTS WHERE FILE_ID
= %s AND %s BETWEEN BLOCK_ID AND BLOCK_ID + BLOCKS - 1;\n", $1, $2); }'> find_segs.sql

3. Run the script (this may take a while)

SQLPLUS> col SEGMENT_NAME format a30
SQLPLUS> spool corrupted_segments.log
SQLPLUS> @find_segs
SQLPLUS> spool off

4. Get the segment names

sort -u corrupted_segments.log


Done..!!

Renaming UNNAMED datafile(s) to standby database

$
0
0

Renaming UNNAMED datafile(s) to standby database

If parameter STANDBY_FILE_MANAGEMENT is set to MANUAL in Oracle standby database you may get
this error when rolling forward:

Media Recovery Log logfile.arc
File #416 added to control file as 'UNNAMED00416' because
the parameter STANDBY_FILE_MANAGEMENT is set to MANUAL
The file should be manually created to continue.
Errors with log logfile.arc
Some recovered datafiles maybe left media fuzzy
Media recovery may continue but open resetlogs may fail
Thu Dec 22 15:34:33 2016
Media Recovery failed with error 1274
ORA-283 signalled during: ALTER DATABASE RECOVER automatic standby database ...

What has to be done is as follows.

On standby database:

SQL> select name from v$datafile where name like '%UNNAMED00416%';

NAME
--------------------------------------------------------------------------------
/apps/oracle/product/10.1.0/db_1/dbs/UNNAMED00416


On production database:

SQL> select name from v$datafile where file# = 416;

NAME
--------------------------------------------------------------------------------
path_to_the_actual_file.dbf

And finally on standby database again:

SQL> alter database create datafile '/apps/oracle/product/10.1.0/db_1/dbs/UNNAMED00416' as
'path_to_the_actual_file.dbf';


Done..!!

Article 1

$
0
0


Oracle WebLogic Server does not start after domain creation


after installation of WebLogic binaries and creation of the simplest domain configuration (only with Admin Server) from scratch, during the attempt of the first launch of AdminServer it does not start after domain creation and it throws the following error exception: «A failure occurred attempting to load LDIF for provider…».

See bellow the log:

####<Mar 19, 2015 5:19:19 PM MSK> <Error>
<Security> <Unknown> <AdminServer> <[ACTIVE]
ExecuteThread: '0' for queue: 'weblogic.kernel.Default (self-tuning)'>
<<WLS Kernel>> <> <> <1426771159618>
<BEA-090870> <The realm "myrealm" failed to be loaded:
weblogic.security.service.SecurityServiceException:
com.bea.common.engine.ServiceInitializationException:
weblogic.security.spi.ProviderInitializationException: A failure occurred
attempting to load LDIF for provider Authorizer from file
/home/oracle/Oracle/Middleware/wlserver/server/lib/XACMLAuthorizerInit.ldift..
At the first glance the problem is related to RDBMS security store. The possible solution could be executing rdbms_security_store_oracle.sql script which is placed under $WL_HOME/server/lib directory. But not in my case, as I did not use RDBMS security store.
The solution of my problem was much easier. You just need to check your /etc/hosts configuration file (in my case I’ve used OL6 OS) and ensure that you added the line with appropriate machine IP address and hostname as in example below:
[root@ol6u5
~]# cat /etc/hosts

192.168.56.199 ol6u5 ol6u5.ru.doyensys.com
After this action Admin Server was started successfully.
Be happy with your WebLogic Server Configuration!

Article 0

$
0
0

Resource manager capabilities (limit CPU and sessions)


---------------------------------------------------------------------------
-- Create plan with consumer groups
---------------------------------------------------------------------------

exec dbms_resource_manager.create_pending_area;

exec dbms_resource_manager.delete_plan_cascade('night_plan');

exec dbms_resource_manager.create_plan('night_plan', 'Plan to use after 6PM');
exec dbms_resource_manager.create_consumer_group('batch', 'Group for batch reports');

exec dbms_resource_manager.create_plan_directive('night_plan', 'batch', 'Rules for overnight batch jobs', -
cpu_p1 => 75, parallel_degree_limit_p1 => 20);
exec dbms_resource_manager.create_plan_directive('night_plan', 'OTHER_GROUPS', 'Rules for overnight batch jobs', -
cpu_p1 => 25, parallel_degree_limit_p1 => 0, -
max_active_sess_target_p1 => 1);

exec dbms_resource_manager.validate_pending_area;
exec dbms_resource_manager.submit_pending_area;

---------------------------------------------------------------------------
-- List plans and consumer groups
---------------------------------------------------------------------------

set pages 50000
col plan format a12
col status format a7
col cpu_p1 format 999
col cpu_p2 format 999
col cpu_p3 format 999
col group_or_subplan format a17
col parallel_degree_limit_p1 format 999

select plan, num_plan_directives, status, mandatory from sys.dba_rsrc_plans;

select plan, group_or_subplan, cpu_p1, cpu_p2, cpu_p3, parallel_degree_limit_p1 as parallel, status
from sys.dba_rsrc_plan_directives
order by plan;

---------------------------------------------------------------------------
-- Switch a user to a new consumer group
---------------------------------------------------------------------------

exec dbms_resource_manager_privs.grant_switch_consumer_group('SCOTT', 'batch', FALSE);
exec dbms_resource_manager.set_initial_consumer_group('SCOTT', 'batch');

-- exec dbms_resource_manager.switch_consumer_group_for_user('SCOTT', 'batch'); -- Switch on-line users

select username, initial_rsrc_consumer_group from sys.dba_users where username = 'SCOTT';

---------------------------------------------------------------------------
-- Enable resource management for this instance
---------------------------------------------------------------------------
alter system set resource_manager_plan = 'NIGHT_PLAN';

---------------------------------------------------------------------------
-- Monitor the resource manager
---------------------------------------------------------------------------

col program format a40
select program, resource_consumer_group from sys.v_$session where username = 'SCOTT';

-- select * from sys.v_$rsrc_plan;
select * from sys.v_$rsrc_consumer_group;

Troubleshooting Oracle Workflow Mailer Issues

$
0
0

This Post helps you to find almost straight solutions for the issues  you are facing in Oracle Workflow Mailer.

Assumption: It is  assumed that you have basic configuration knowledge related to Oracle workflow mailer. if not refer to my previous posts in which i have explained about workflow mailer configuration.

If you go through this post from start to end , you will get complete picture of workflow  mailer issues and solutions

Broad Head 1 : Oracle Workflow Mailer services is down

1. Login to Oracle applications --> System administrator --> oracle Applications manager --> workflow

2. Click over notification mailer.


3. Click on View log button. and see is there any errors in the logfile.

POSSIBLE CAUSE 1 : INCORRECT SMTP SERVER ADDRESS OR SMTP SERVER IS NOT ACCESSIBLE.

1. Login to Oracle applications --> System administrator --> oracle Applications manager --> workflow

3. click on view details button , ensure that the outbound server name is correct.

3.1 if it is not correct, click on EDIT button, enter the valid smtp server address.

3.2 if SMTP Server address is correct, do telnet <smtp server> <smtp port> from Oracle Applications server where concurrent is running. 

telnet mail.gmail.com 25

if it not reachable, connect with exchange team and network team for either resolution or for alternate smtp address.


POSSIBLE CAUSE 2 : Inbound email address is not accessible.

1. Login to your workflow webmail account with the password provided in the workflow mailer setup.

2. Ensure that the webmail login is successful , if successful, ensure that the inbox/mail box has suffiecient space.

2.1 if it not accessible , connect with exchange team , reset the password and ensure you can login successfully , once successful, Oracle applications --> System administrator --> oracle Applications manager --> workflow --> Notification Mailer --> Edit --> Enter the new password.

2.2 once accessible , and mail box found to be full , clean all old/obsolete mails from DISCARD AND PROCESS FOLDER.

2.3 Once above two steps are done and success, restart the workflow mailer once.


Broad Head 2 : Oracle Workflow Mailer services is up and still emails are not going.

POSSIBLE CAUSE 1 : WF: Workflow Mailer Framework Web Agent profile was either set to null or not valid.

1. Navigate --> System administrator -->Profiles --> system

2. Query "WF: Workflow Mailer Framework Web Agent", click find, ensure "IT SHOULD HAVE PHYSICAL WEB SERVER ADDRESS AND ACTIVE WEB PORT ENTRY", if in case your web URL is virtual host. 


(Before that ensure that the URL is accessible from your machine).


POSSIBLE CAUSE 2 : WF: Workflow Mailer Framework Web Agent profile is correct but still emails are not going - Then OUTBOUND QUEUE GOT CORRUPTED.


Login to Oracle applications as sysadmin and deactivate Workflow Service components.

Sysadmin System administrator Workflow Sitemap Click over Service Components Click over Workflow agent listener Service Stop all and click go button.

Once all the services deactivated, proceed with the next step.

Login to any application node, set the environment, and execute the notification queue populate script.

. ./APPSEBS01_a111.env

cd $FND_TOP/patch/115/sql

sqlplus apps/<apps pwd>

SQL> start wfntfqup APPS <apps password> APPLSYS

Example:

SQL> start wfntfqup APPS apps123 APPLSYS

Login to Oracle applications as sysadmin and activate Workflow Service components.

Sysadmin System administrator Workflow Sitemap Click over Service Components Click over Workflow agent listener Service Start all and click go button

POSSIBLE CAUSE 3 : Inbound email is full.

the below points are already mentioned in this post though, but are required for check and fix the issue.

1. Login to your workflow webmail account with the password provided in the workflow mailer setup.

2. Ensure that the webmail login is successful , if successful, ensure that the inbox/mail box has suffiecient space.

2.1 if it not accessible , connect with exchange team , reset the password and ensure you can login successfully , once successful, Oracle applications --> System administrator --> oracle Applications manager --> workflow --> Notification Mailer --> Edit --> Enter the new password.

2.2 once accessible , and mail box found to be full , clean all old/obsolete mails from DISCARD AND PROCESS FOLDER.

2.3 Once above two steps are done and success, restart the workflow mailer once.

-- Narasimha Rao
Viewing all 1640 articles
Browse latest View live


<script src="https://jsc.adskeeper.com/r/s/rssing.com.1596347.js" async> </script>